Film Lighting Basics: Motivate Your Scene and Your Audience Through Direction
This is Part 4 of a Film Lighting Basics series from Robert Machado and Jeremy Le. The series will cover Intensity, Quality, Color, Shape, and Direction.
When planning a scene, choosing the direction of a lighting source is one of the first things you should decide.
Remember - lighting a scene is always in service of the story. The mood created by a source of light is heavily influenced by its direction.

 Since the warehouse location wasn’t too large, I was able to use a grid of aluminum clamp fixtures. I found these at my local hardware store for a few dollars each. The bulbs I used were 100w equivalent daylight balanced CFL, also from the same hardware store. Shooting on a Red Epic MX at 800 ASA, a grid of 8 CFL bulbs hung 10 feet above the set gave me more than enough light for normal exposure.

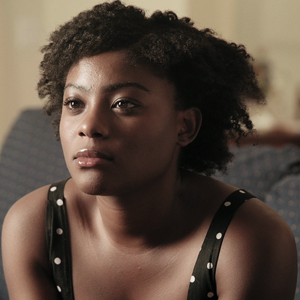
 You’ll notice in the pictures above, the main sources of light are coming from the opposite side of where the camera is looking. You are effectively filming into the shadow side of the actor’s face.
Watch any modern movie and you’ll notice that the majority of scenes have the camera shooting in this way - into the shadow (or fill) side of the face. This is a very common technique because it allows you very fine control over the look and mood of the scene. The key light creates shadows which help define a person’s face and creates contrast in the image. Once you have your key light dialed in, you can then easily control the amount of fill depending on the mood or style you feel is right.
Finding the perfect direction of light is one of the most important aspects of lighting. It can suspend or break your audience’s disbelief in your film’s story. Make it one of the first things you consider. Once that’s sorted, the rest of your setup will be much easier to determine, and you will save a ton of time on set.
******************************************************************************
This is the 5th in a 5 part film lighting basics series from Robert Machado and Jeremy Le.
Read Part 1 - Film Lighting Basics: The Tools you Need to Become a Master of Intensity
Read Part 2 - Film Lighting Basics: Soft Lighting and Hard Lighting in Film
Read Part 3 - Film Lighting Basics: What’s the Color of Your Movie?
Read Part 4 - Film Lighting Basics: 6 Ways to Shape Your Light (and Shadows)
You’ll notice in the pictures above, the main sources of light are coming from the opposite side of where the camera is looking. You are effectively filming into the shadow side of the actor’s face.
Watch any modern movie and you’ll notice that the majority of scenes have the camera shooting in this way - into the shadow (or fill) side of the face. This is a very common technique because it allows you very fine control over the look and mood of the scene. The key light creates shadows which help define a person’s face and creates contrast in the image. Once you have your key light dialed in, you can then easily control the amount of fill depending on the mood or style you feel is right.
Finding the perfect direction of light is one of the most important aspects of lighting. It can suspend or break your audience’s disbelief in your film’s story. Make it one of the first things you consider. Once that’s sorted, the rest of your setup will be much easier to determine, and you will save a ton of time on set.
******************************************************************************
This is the 5th in a 5 part film lighting basics series from Robert Machado and Jeremy Le.
Read Part 1 - Film Lighting Basics: The Tools you Need to Become a Master of Intensity
Read Part 2 - Film Lighting Basics: Soft Lighting and Hard Lighting in Film
Read Part 3 - Film Lighting Basics: What’s the Color of Your Movie?
Read Part 4 - Film Lighting Basics: 6 Ways to Shape Your Light (and Shadows)

Grounded in Reality
Think of where a source of light comes from in the real world. If you’re inside a building, it might come from the windows on the side or lights from overhead. If you’re outside during the day, your main source of light (key light) is usually the sun overhead. If it is nighttime, your sources are most likely going to be the street lamps overhead or tall buildings. Whether you’re shooting a fantastical film set on another world or a drama taking place in your hometown, grounding your lighting in reality helps your audience connect. It’s your job to help them become invested in your story.Find Your Motivation
First ask yourself - where is the main motivation of lighting? This gives you a starting point to help you grow the scene. For example, I recently shot a project that took place in a warehouse. In my experience, warehouses usually have fluorescent work lights hanging overhead. So I chose an overhead setup as my main lighting source.
Since the warehouse location wasn’t too large, I was able to use a grid of aluminum clamp fixtures. I found these at my local hardware store for a few dollars each. The bulbs I used were 100w equivalent daylight balanced CFL, also from the same hardware store. Shooting on a Red Epic MX at 800 ASA, a grid of 8 CFL bulbs hung 10 feet above the set gave me more than enough light for normal exposure.
Many Sources Become One
The choice and number of fixtures you use will depend on your camera’s sensor, lenses, area of coverage on location, and quality of light you want. It is important to note that your “source” of light is considered to be the last thing that the light touches before reaching the object that it is lighting. In my example above, I had 8 clamp lights hung above. With no diffusion, each of those lights is its own source because there is nothing in between the light at the actor. Since there are many different sources, that creates multiple shadows. To alleviate that issue, I used a hazer to fill the room with what is basically a form of aerial diffusion. Since the light coming from the bulbs pass through the diffusion before falling on the actor, the haze in the room becomes the new “source”. The same concept applies when using a softbox or a 4x4 silk. Since the softbox or 4x4 is the last thing the light hits before falling on the actor, the softbox or 4x4 is the new source of light. Remember, the bigger the lighting source, the softer the quality of light. You can read more about the quality of light in this blog post. Every variable of lighting is interconnected so it is important to understand all aspects to help you make your choices.Switch It Up
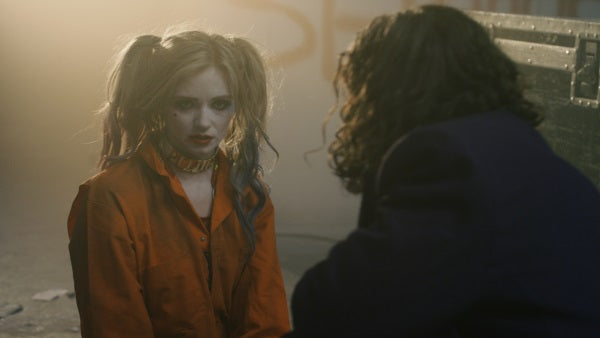
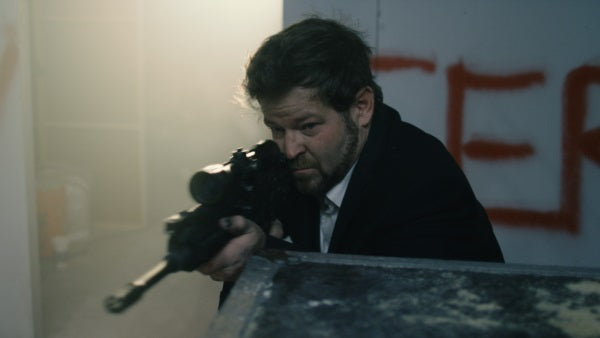
Another very common technique is to put your key on the opposite side of the eyeline in relation to the camera. So, if your camera is shooting your actor’s right side of the face, the key would be placed on the left side.
You’ll notice in the pictures above, the main sources of light are coming from the opposite side of where the camera is looking. You are effectively filming into the shadow side of the actor’s face.
Watch any modern movie and you’ll notice that the majority of scenes have the camera shooting in this way - into the shadow (or fill) side of the face. This is a very common technique because it allows you very fine control over the look and mood of the scene. The key light creates shadows which help define a person’s face and creates contrast in the image. Once you have your key light dialed in, you can then easily control the amount of fill depending on the mood or style you feel is right.
Finding the perfect direction of light is one of the most important aspects of lighting. It can suspend or break your audience’s disbelief in your film’s story. Make it one of the first things you consider. Once that’s sorted, the rest of your setup will be much easier to determine, and you will save a ton of time on set.
******************************************************************************
This is the 5th in a 5 part film lighting basics series from Robert Machado and Jeremy Le.
Read Part 1 - Film Lighting Basics: The Tools you Need to Become a Master of Intensity
Read Part 2 - Film Lighting Basics: Soft Lighting and Hard Lighting in Film
Read Part 3 - Film Lighting Basics: What’s the Color of Your Movie?
Read Part 4 - Film Lighting Basics: 6 Ways to Shape Your Light (and Shadows)
Leave a comment