
Film Lighting Basics: 6 Ways to Shape Your Light (and Shadows)
This is Part 4 of a Film Lighting Basics series from Robert Machado and Jeremy Le. The series will cover Intensity, Quality, Color, Shape, and Direction.
Shaping light is closely related to its direction; in the process, we are selectively choosing where shadows fall and what shapes they take. When considering the shape of your light, it's essential to remember that the absence of light is just as important as the prevalence of light.
 In this example, we used a 4x4 bounce to keep the LED panel from spilling onto the back wall. Flagging the background light adds more dimension and contrast to the scene, placing more emphasis on the subject.


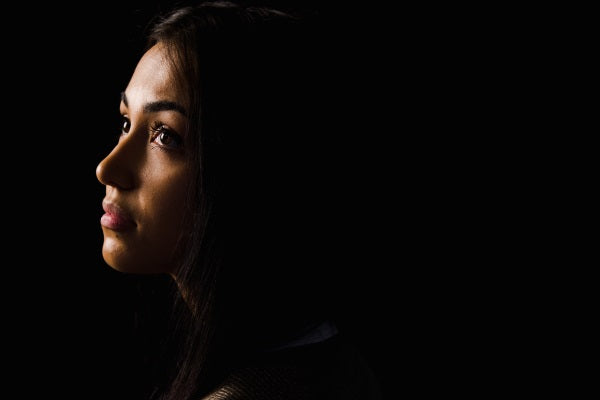 Grids can be used to selectively control light while retaining a source’s soft quality.
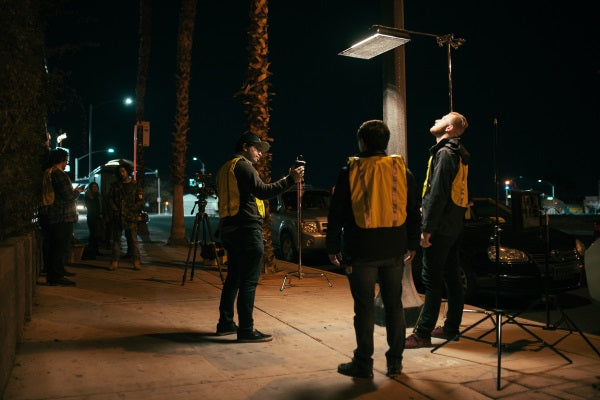 In this scene, we used Litemats with a grid to act as a streetlight along a sidewalk. This helps prevent “overlighting” since the scene was a night exterior and should be relatively low key.


1. Black Flags
The most basic film tools used for shaping light are black flags, also known as cutters. Cutters are usually available in rectangles/squares and are placed in front of lights to selectively shape how light falls onto a scene.2. Bounce Lighting
Bounce lighting is achieved in many different ways. It shapes the light into a larger source, giving a more even spread across the subject. You can further shape bounce lighting with an additional layer of diffusion between the bounce and subject. This diffuses an already-soft source and wraps the light even more across the subject. This is more commonly known as a “book light,” coined by Shane Hurlbut. Since soft light is spread across broad directions, it becomes harder to control the spill. This is where flags and solids “cut” any unwanted spill light and help direct the light to only hit a specific area. A soft cut will render the shadow line barely visible, while a hard cut will cast a shadow that is sharp and defined. For soft cuts, place the flag closer to the source. For hard cuts, place the flag further from the source. Black solids are also used as a negative fill to increase a subject’s contrast ratio to fit the mood and tone of the story.
In this example, we used a 4x4 bounce to keep the LED panel from spilling onto the back wall. Flagging the background light adds more dimension and contrast to the scene, placing more emphasis on the subject.
3. Skirting
Another method of shaping light is through skirting. This technique makes light more directional by preventing spill from ceilings or walls. When skirting an overhead light, something as simple as a black cloth can be fixed around the light so that it only falls on the area immediately below. This creates a literal “skirt” that adds dimension to lighting.4. Blackwrap
A simple, yet versatile method of shaping light is by using blackwrap. Blackwrap is basically matte-black aluminum foil that can be easily molded to just about any support fixture. You can mold it into just about any shape you desire and is super versatile for shaping light in a pinch.5. Grids
Grids are one of my favorite ways in shaping light. Fixtures sometimes incorporate the use of an egg-crate/grid, which is attached the source itself. This preserves a source’s soft quality but kills any unwanted spill.
Grids can be used to selectively control light while retaining a source’s soft quality.
In this scene, we used Litemats with a grid to act as a streetlight along a sidewalk. This helps prevent “overlighting” since the scene was a night exterior and should be relatively low key.
6. Cookies
A cucoloris (more commonly known as a “cookie”) can be used to break up light into specific patterns. Cookies are usually made of wood with a design cut into them. Light gains unique texture by passing through the cut shape. Practically anything can be used as a device to shape light: tree branches, fabric, baskets, etc.. The availability of organic light shaping sources like these is something to keep in mind when scouting locations. It is incredibly important to shape light so that a scene’s lighting doesn’t become flat. As visual storytellers, we are able to direct a viewer’s attention through the selective placement of light and shadow. Contrast is an important tool here - instead of thinking of it as "painting with light", think instead of "painting with shadow". ****************************************************************************** This is the 4th in a 5 part film lighting basics series from Robert Machado and Jeremy Le. Read Part 1 - Film Lighting Basics: The Tools you Need to Become a Master of Intensity Read Part 2 - Film Lighting Basics: Soft Lighting and Hard Lighting in Film Read Part 3 - Film Lighting Basics: What’s the Color of Your Movie? Read Part 5 - Film Lighting Basics: Motivate Your Scene and Your Audience Through Direction
Leave a comment