How to Edit a Real Estate Film
Editing a real estate video varies from a standard edit really only in style and goal. The style of video that we like to produce almost act like a “fish hook” for a potential home-owner. Meaning, when someone who is looking to purchase the home watches one of our videos, we want to hit them with only the best shots from our shoot. That usually means we have no filler at all; “short and sweet” so to say. Upon completion of watching the video, we want the viewer to feel like maybe they didn't get to see everything and to want more. Our goal is to have our viewer seek more information from the property website and in turn call the broker to eventually see the home in person. In this way it is similar to creating a trailer or teaser as opposed to a feature.
 From there we organize the clips into three parts that make up each video.
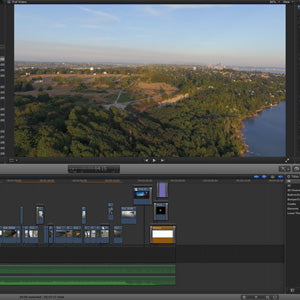
 After our song is chosen and all of our clips are in place we go through and do all of our coloring, add LUTS and add any extra effects if needed. From there we add the correct credits and bumpers and the edit is then complete. Through Final Cut X we export a ProRes 422 file and send it to Apple Compressor. Compressor already has some great compression options including one directly for Vimeo that we feel gives us a great image at a manageable file size.
And then, we have a finished product! Here is one of our latest lifestyle / real estate videos.
Read my first post about How to Shoot a Real Estate Film here.

The Magic YouTube Number
This style of editing was a little harder to push through a few years back, as some real estate brokers felt that the videos were too short and didn't show every part of the home. TIP #1 As of last year, the average YouTube watch time has dropped to under 3 minutes. So, it is imperative that we keep these videos short to make sure the viewer watches the complete video…and is left wanting more! This is now our current model and we have seen some very strong statistics as far as clickthroughs and low bounce rate to other websites.Prep Prep Prep
When editing a real estate video we start with logging and organizing all of our footage. TIP #2 We rate each clip on a scale of 1 to 3 in order to decide which clips are a must in the video, which clips are a possible if we need a certain shot, and which clips are unusable. From there we convert all of our chosen clips to ProRes 422 optimized for Final Cut Pro X via a software program called Clip Wrap. This insures that all of our clips will work smoothly with Final Cut and will need minimal rendering. This saves us a lot of time in the long run. From there we organize the clips into three parts that make up each video.
1. The Location
The first part of the video always focuses on the location. One of the most important ways we can catch a viewer’s interest is with some beautiful shots of the location that the home or development resides in. Often we will go in chronological order of the day. TIP #3 Early morning golden hour and drone shots really bring the viewer to the destination. The market is so crazy in Seattle right now and people are focusing on buying in specific locations they think will rise in value. This often means they will overspend on a smaller home or one that needs a lot of work. This means highlighting the location is even more important for us right now.2. The Home
Once we get some great beauty shots in the timeline of our destination we then transition to the home. This is the meat of the video where it is really important not to lose a potential buyers attention and to keep them glued to the screen. TIP #4 We focus mainly on the best parts of the home or development and leave out anything that would be considered standard, average, or undesirable. A good example of this would be for a house we recently shot in North Seattle. There were 6 possible bedrooms to film along with 5 bathrooms and 4 additional living rooms. We chose to capture the master only, a few of the living rooms on the main floor and the basement, as it had been converted into the ultimate social lounge. To us, these parts of the home were the highlights that would attract a buyer. Focusing on these best attributes lets the buyer imagine what it would be like to live in the home rather than giving them a virtual tour. Showing all 6 bedrooms would get boring very quickly. (And there is usually a photo gallery accompanying the video listings that can show them anything we passed over.) Watch the video…3. The Lifestyle
This is a fairly new section that we just started including a year or so ago. If a home or development has a big enough budget, often times its good to show people using the property or home. This in turn gives the viewer a very strong visual of what it’s like to actually live there and gives it a sense of place. Things like family interaction, daily life and outside activities are shots that we like to portray to get that sense of what it feels like to live in the subject property. TIP #5 Clips that indirectly show the house through activity are also shots that we look for in order to almost indirectly sell the house through the experience the viewer is watching. Once we have the best clips of the home and location in the timeline we then start to intersperse some lifestyle shots in to bring everything together and tell a story.Music Brings It All Together
Music is a huge part of my life and I am always searching for that next, perfect track. It is one of the most, if not the most, important parts of an edit for me. The song is just as important as the footage, and finding the right one can sometimes be a challenge. Thankfully these days there are a ton of great sites out there to license royalty free music and it is much less of a problem than it used to be. Some of my favorites are audiosocket.com, premiumbeat.com, and musicbed.com. After our song is chosen and all of our clips are in place we go through and do all of our coloring, add LUTS and add any extra effects if needed. From there we add the correct credits and bumpers and the edit is then complete. Through Final Cut X we export a ProRes 422 file and send it to Apple Compressor. Compressor already has some great compression options including one directly for Vimeo that we feel gives us a great image at a manageable file size.
And then, we have a finished product! Here is one of our latest lifestyle / real estate videos.
Read my first post about How to Shoot a Real Estate Film here.


Leave a comment